Multi-channel Notifications
Artalk supports sending administrator notifications through its multi-channel notification feature in various ways.
Supported platforms include Telegram, Feishu, DingTalk, Bark, Slack, and LINE, with the ability to enable multiple methods simultaneously.
You can modify these configurations in the settings interface of the Dashboard or via the configuration file or environment variables.
Configuration File
The complete admin_notify configuration is as follows:
Click to reveal
# Multi-channel Notifications
admin_notify:
  # Notification Template
  notify_tpl: default
  noise_mode: false
  # Email notification for administrators
  email:
    enabled: true # Disable email notifications for administrators when using other push methods
    mail_subject: '[{{site_name}}] Your article "{{page_title}}" has a new reply'
    mail_tpl: ''
  # Telegram
  telegram:
    enabled: false
    api_token: ''
    receivers:
      - 7777777
  # Feishu
  lark:
    enabled: false
    webhook_url: ''
  # DingTalk
  ding_talk:
    enabled: false
    token: ''
    secret: ''
  # Bark
  bark:
    enabled: false
    server: http://day.app/xxxxxxx/
  # Slack
  slack:
    enabled: false
    oauth_token: ''
    receivers:
      - CHANNEL_ID
  # LINE
  line:
    enabled: false
    channel_secret: ''
    channel_access_token: ''
    receivers:
      - USER_ID_1
      - GROUP_ID_1
  # WebHook
  webhook:
    enabled: false
    url: ''
Email Notifications
Send message notifications to administrators via email.
admin_notify:
  enabled: true # Disable email notifications for administrators when using other push methods
  mail_subject: '[{{site_name}}] Your article "{{page_title}}" has a new reply'
  mail_tpl: ''
You can disable email notifications when using other push methods.
Before doing this, you need to configure the global email sending functionality: refer here.
Administrator Email Template
The
mail_subjectconfiguration item is the email subject sent to the administrator.The
mail_tplconfiguration item specifies the email template for the administrator (fill in the email template file path).(If this item is empty, it will inherit the
email.mail_tplconfiguration item).
Telegram
admin_notify:
  # Telegram
  telegram:
    enabled: true
    api_token: ''
    receivers:
- 7777777api_token: The API token for the TG Bot.receivers: The numeric IDs of the message recipients, multiple recipients can be set.
Creating a TG Bot
Search for @BotFather, reply with /newbot, and follow the prompts to create a new TG bot.
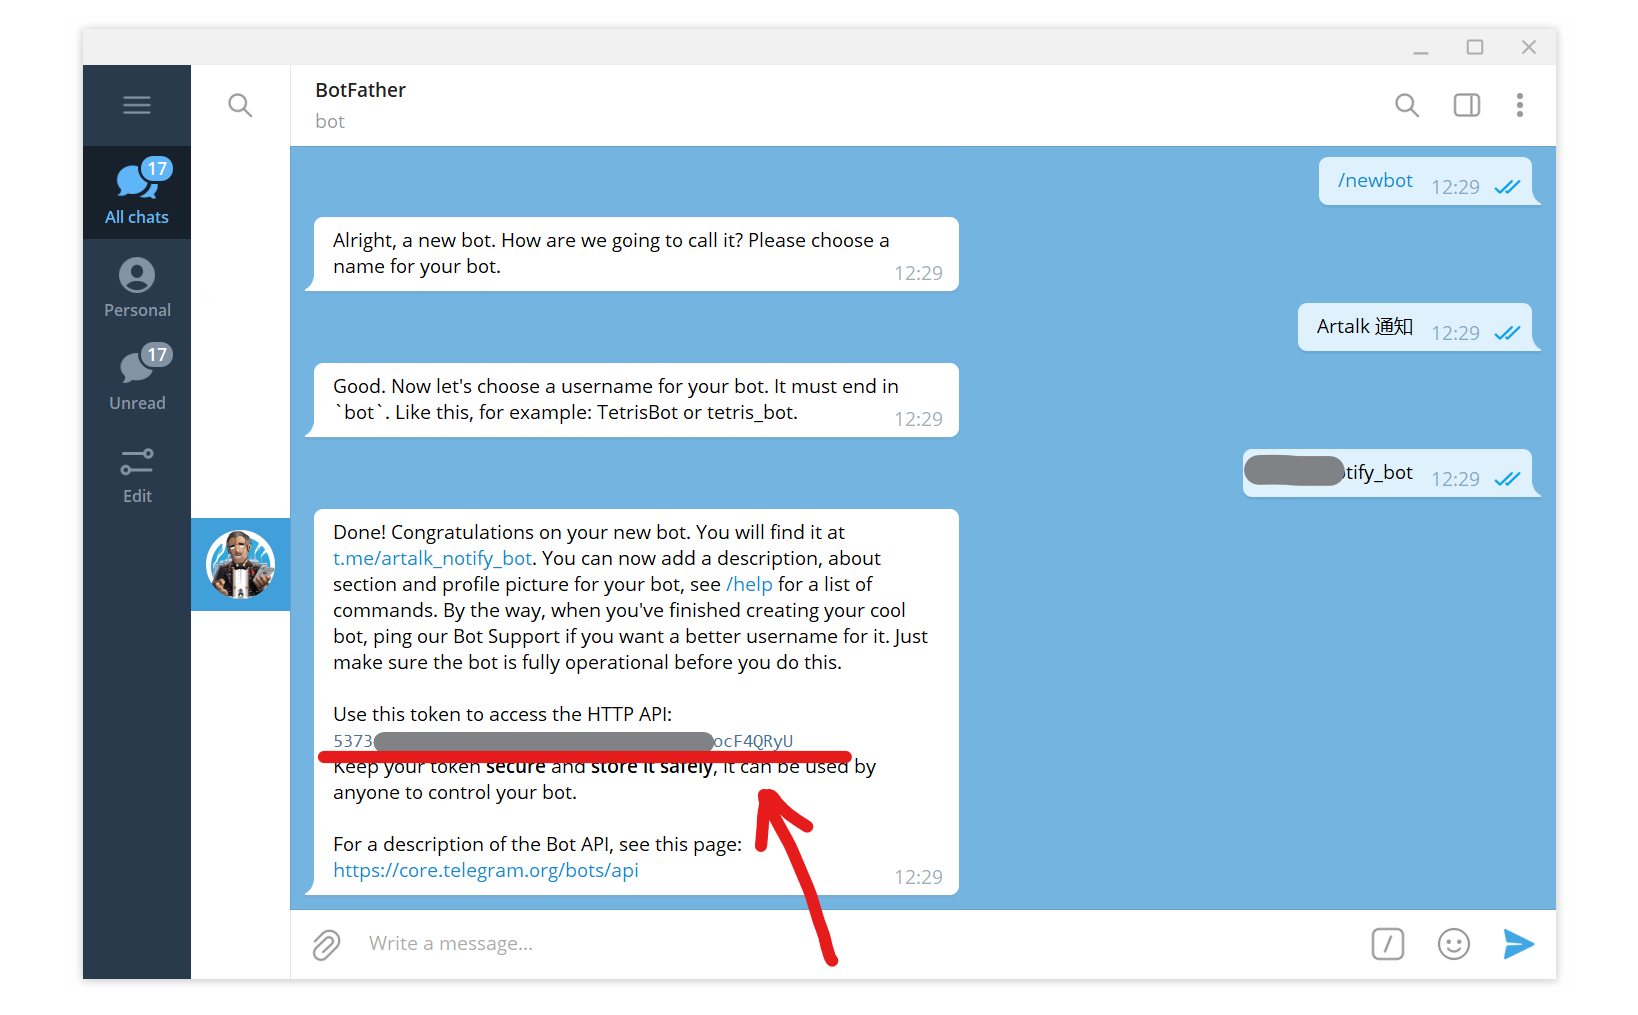
The red text is the api_token you need to fill in Artalk's configuration.
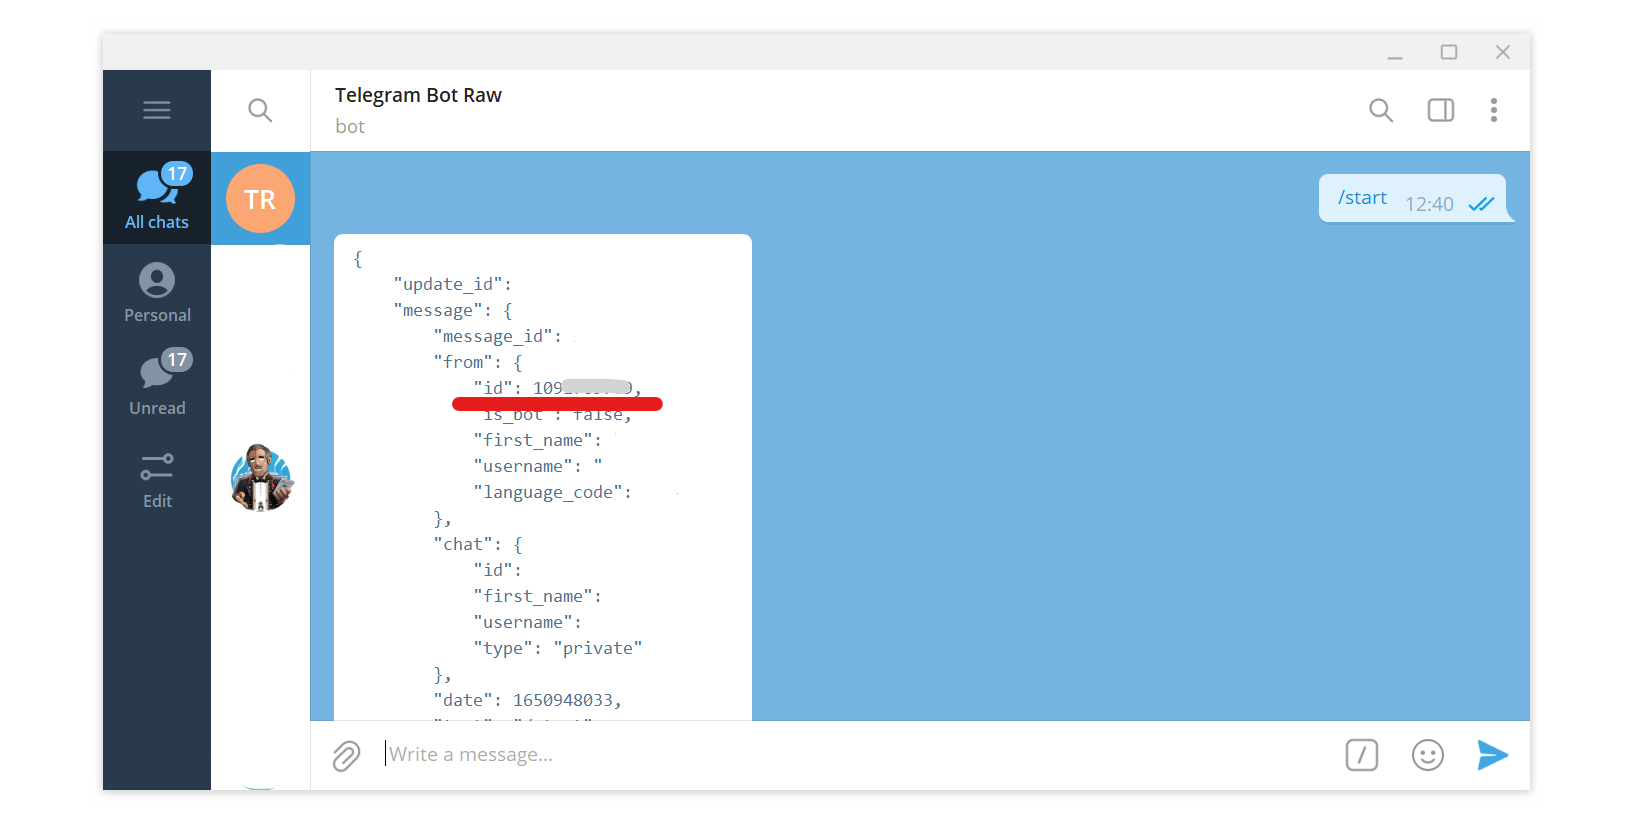
Fill in the receivers field with the numeric IDs of the accounts that need to receive messages. You can use @RawDataBot to get these IDs, as shown:
For more details, refer to: Bots: An introduction for developers - Telegram
TIP
Given the complex network environment, if you need to use a proxy, configure the environment variable before starting Artalk, for example:
export https_proxy=http://127.0.0.1:7890Feishu
admin_notify:
  # Feishu
  lark:
    enabled: true
webhook_url: ''webhook_url: The WebHook address obtained when creating the group bot.
Creating a Group Bot
Click the plus sign at the top to create a new group:
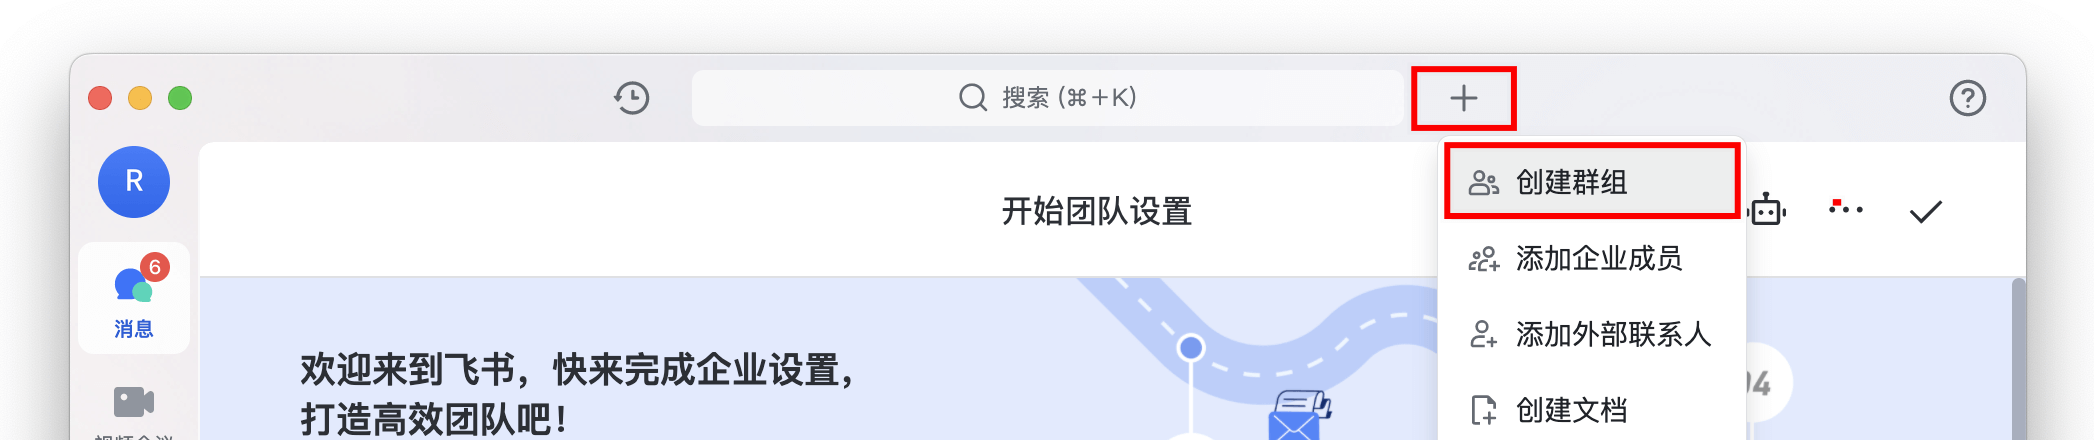
Find "Group Settings" on the right, select "Group Bot", click "Add Bot", choose "Custom Bot", and follow the prompts to create it.
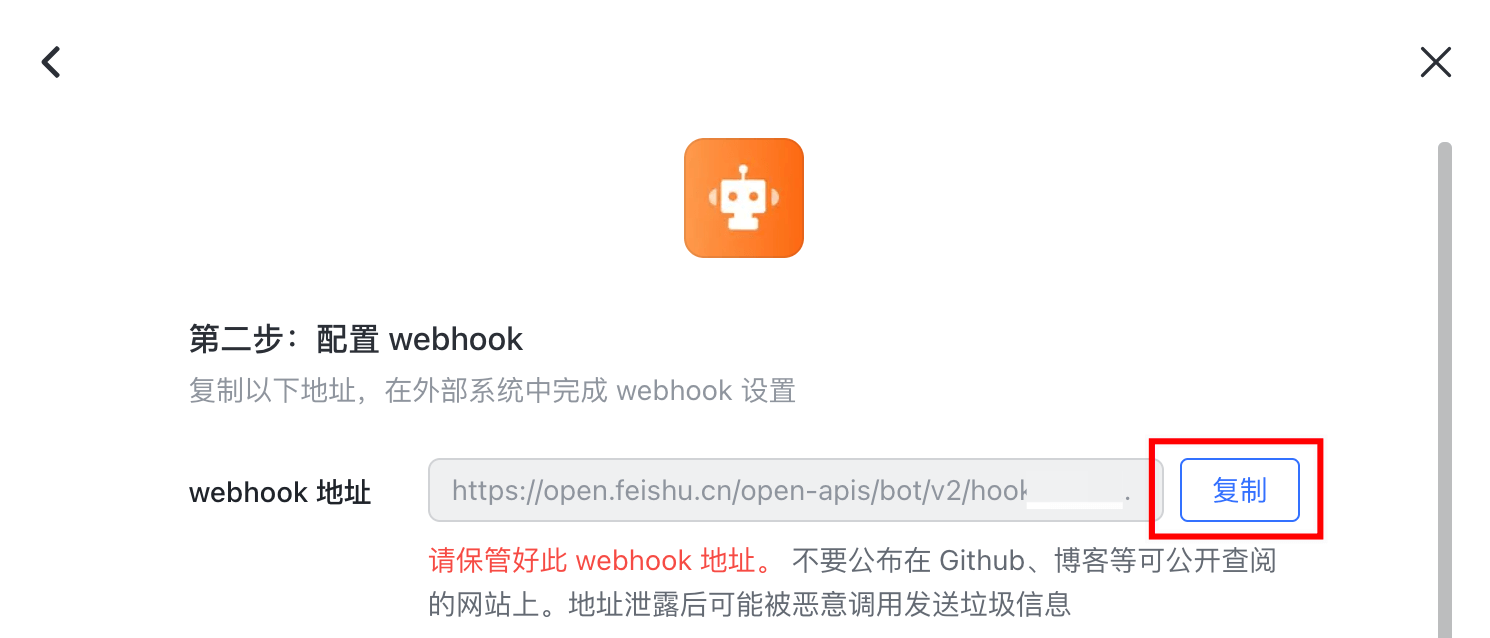
Copy the WebHook address as shown above and modify Artalk's webhook_url configuration.
For more details, refer to: Feishu Help Center Documentation
DingTalk
admin_notify:
  # DingTalk
  ding_talk:
    enabled: true
    token: ''
    secret: ''
Refer to: DingTalk Open Documentation
Bark
admin_notify:
  # Bark
  bark:
    enabled: true
    server: http://day.app/xxxxxxx/
Bark is an open-source iOS app that supports self-hosting, allowing you to easily push messages to your iOS device.
You can search and download it from the App Store and get the server configuration item to fill in Artalk:

Slack
admin_notify:
  # Slack
  slack:
    enabled: true
    oauth_token: ''
    receivers:
      - CHANNEL_ID
LINE
admin_notify:
  # LINE
  line:
    enabled: true
    channel_secret: ''
    channel_access_token: ''
    receivers:
      - USER_ID_1
      - GROUP_ID_1
Notification Template
admin_notify:
  notify_tpl: default
The admin_notify.notify_tpl configuration item can be set to a custom notification template file path. The default notification template is:
@{{reply_nick}}:

{{reply_content}}

{{link_to_reply}}
The available variables are the same as in the email template, refer to: Email Template
Notify Pending Comments notify_pending
admin_notify:
  notify_pending: false
notify_pending is turned off by default. When set to false, pending comments will not send notifications. You can view all pending comments in the Dashboard.
Noise Mode noise_mode
admin_notify:
  noise_mode: false
noise_mode is turned off by default. When set to false, only messages directed to the administrator will send notifications. For example, communication between "User A" and "User B" will not notify the administrator.
Note: When moderator.pending_default is set to true, noise_mode is always enabled.
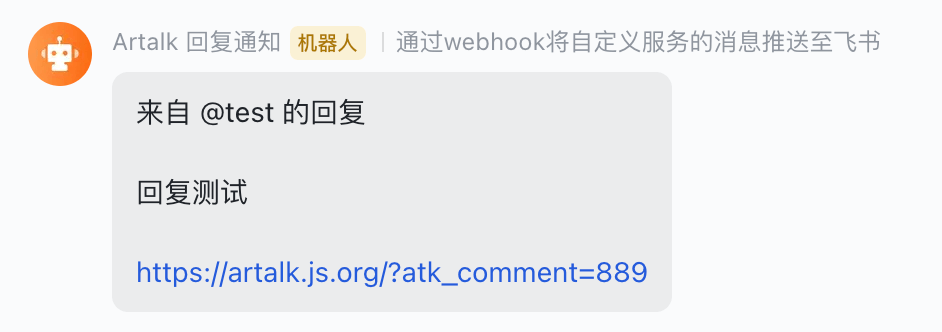
WebHook Callback
When WebHook is enabled, a new comment will send a POST request with application/json type Body data to the specified WebHook address.
You can write your own server-side code to handle requests from Artalk.
Artalk Configuration File
admin_notify:
  webhook:
    enabled: true
    url: http://localhost:8080/
Body Data Content
application/json type
| Key | Description | Type | Remarks |
|---|---|---|---|
notify_subject | Notification Title | String | Corresponds to the admin_notify.notify_subject configuration item |
notify_body | Notification Content | String | Rendered according to the admin_notify.notify_tpl template |
comment | Comment Content | Object | New comment data object |
parent_comment | Target of Comment Reply | Object | If it's a root comment, the value is null |
Body Data Sample
{
  "notify_subject": "",
  "notify_body": "@TestUser:\n\nTestContent\n\nhttps://127.0.0.1/index.html?atk_comment=1057",
  "comment": {
    "id": 1057,
    "content": "TestContent",
    "user_id": 226,
    "nick": "TestUser",
    "email_encrypted": "654236c1e78i4c09a17c4869c9d43910",
    "link": "https://qwqaq.com",
    "ua": "Mozilla/5.0 (Macintosh; Intel Mac OS X 12_4_0) AppleWebKit/537.36 (KHTML, like Gecko) Chrome/101.0.4951.64 Safari/537.36",
    "date": "2022-05-23 17:00:23",
    "is_collapsed": false,
    "is_pending": false,
    "is_pinned": false,
    "is_allow_reply": false,
    "rid": 0,
    "badge_name": "",
    "badge_color": "",
    "visible": true,
    "vote_up": 0,
    "vote_down": 0,
    "page_key": "/index.html",
    "page_url": "https://127.0.0.1/index.html",
    "site_name": "ArtalkDocs"
  },
  "parent_comment": null
}
Node.js Express Handling Example
const express = require('express')

const app = express()

app.use(express.json()) // Use JSON middleware

app.post('/', (request, response) => {
  console.log(request.body)

  const notifySubject = request.body.notify_subject
  const notifyBody = request.body.notify_body
  console.log(notifySubject, notifyBody)

  response.send(request.body)
})

app.listen(8080)
Node.js HTTP Handling Example
const http = require('http')

const requestListener = (req, res) => {
  // receive json request
  let body = ''
  req.on('data', (data) => {
    body += data
  })
  req.on('end', () => {
    let json = ''
    try {
      json = JSON.parse(body)
    } catch {}

    // do something with json
    console.log(json)
    res.end()
  })

  res.writeHead(200)
  res.end('Hello, World!')
}

const server = http.createServer(requestListener)
server.listen(8080)
PHP Laravel Handling Example
Route::get('/', function (Request $request) {
    $data = $request->json()->all();
    $notify_subject = $data["notify_subject"];
    $notify_body    = $data["notify_body"];
});
Golang net/http Handling Example
package main
import (
"encoding/json"
"log"
"net/http"
)
type ArtalkNotify struct {
NotifySubject string `json:"notify_subject"`
NotifyBody string `json:"notify_body"`
Comment interface{} `json:"comment"`
ParentComment interface{} `json:"parent_comment"`
}
func webhookHandler(rw http.ResponseWriter, req *http.Request) {
decoder := json.NewDecoder(req.Body)
var notify ArtalkNotify
err := decoder.Decode(¬ify)
if err != nil {
panic(err)
}
log.Println(notify.NotifyBody)
}
func main() {
http.HandleFunc("/webhook", webhookHandler)
log.Fatal(http.ListenAndServe(":8080", nil))
} qwqcode